TIPniques: AutoCAD 2010 - Odds and Ends
Springtime is rapidly approaching, and with it comes another new version of AutoCAD.
As a Facilities Management professional (working mainly with MEPFP post-construction documentation), I am not necessarily going to use the biggest and most popular features in each new release of AutoCAD that a production drafter or designer would use. And, in this case, I'll allow the other writers to cover those in depth.
I tend to be more enamored by the little tweaks and improvements that make my life easier. I’ve gathered or developed LISP routines for over the years, but it's nice not to have to mess around with those if I don't have to. For some past examples of my little modifications that add up to big changes:
2009 Odds & Ends
2008 Odds & Ends
First things first
Keeping with tradition, every third release AutoCAD has been given a new file format and it is true with this version as well. Don't forget that a conversion utility is included as a part of DWG TrueView, a free download, so folks without access to the newest version can still save down any newer files they receive.

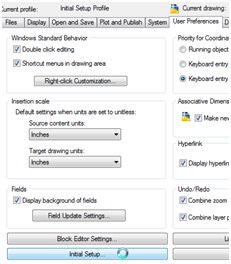
One of the first things you'll notice is that during installation, you're given a choice: you can select from six different industries (or Other: General Design and Documentation), which will affect the Initial Setup of your drawing environment. Don't worry if you miss it during installation because it'll still be available via the Options dialog (User Preferences tab).

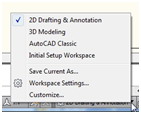
This results in a new workspace, but you can quickly and easily modify the workspace or switch to one of the defaults such as 2D Drafting & Annotation, 3D Modeling, or AutoCAD Classic.

Menu madness
I can already predict that some folks aren't going to like the "application menu" very much. This menu is also known as "the dropdown menu under that big red letter A." Formerly, this contained the entire menu structure previously at the top of the drawing window, but now it contains the most basic functions (open, save, print, etc.) that you see in almost every other program.
I’ve already been irritated by it a few times, but I put my MENUBAR back (set the variable to "1") at the top just in case I need it. I'll admit that I don't use the dropdown menus very often since I like the ribbon for the common commands and I type in the lesser-used stuff at the command line (I know... I'm a relic), but having it there when I do want it is nice.
When using the Ribbon in "dashboard" mode, you'll now have the names of the tabs over on the side, which should make things a little bit easier. Also, the panels have flyouts where additional commands can be found. You can also pull panels off of the Ribbon so they'll remain visible no matter which tab is active. These little guys are referred to as "Sticky Panels."

THE BEST PART here is that you can now (finally) import custom dashboard panels from AutoCAD 2008. This was a much-missed feature in the first iteration of the Ribbon in AutoCAD 2009. You can bring that in using the Transfer tab in the CUI dialog box.
You also have the ability to adjust the context-sensitive menus; explore the Help Topic: "Create a Ribbon Contextual Tab State."
The Customize User Interface files are now .CUIx.
Special additions
So many of us have been looking forward to some PDF improvements. There are the little things, like better files and smaller file sizes. But then there's the biggie - using PDFs as underlays.
For simplicity's sake, I scan our archive documents to PDF so all of our mechanics can open them easily. It irritated me to have to create an image from that scan in order to bring an underlay/reference file into AutoCAD.
Another wonderful addition is searchable text in your output files! On the Output tab, you can choose whether or not to include Layers and determine whether you'll get a multisheet file or single sheet files.


I really like this one... if Hatch can't find a valid boundary area, it will try to flag a problem area (showing red circles around suspected gaps). You can also edit hatches that aren't associative, using grips.

The next improvement is not a real biggie, but it will sure help streamline some of the quick print jobs I do for users from random departents who wander into my office. AutoCAD 2010 allows you to change the color of a layer from the layer dropdown! No need to open the Layer dialog at all. Sweet. Just click on the color and the Select Color dialog will pop up.

A variable that I won't use often, but will definitely appreciate when I do, is VPROTATEASSOC. This setting controls whether or not a view rotates when you rotate its viewport.
There is finally, finally, finally now the built-in ability to measure cumulative distances (if you're not upgrading, do some searches of the customization forums on AUGI.com and the Autodesk Discussion Groups. There should be some routines posted for use in earlier versions). You can also measure angle, area, radius, and volume of objects or a series of points, all using the MEASUREGEOM command. You'll find the tool on the Utilities panel on the Home tab.

A really neat addition to the Purge dialog box is an option to purge "zero-length geometry and empty text objects."

The Undo and Redo buttons now have History support. Use the arrow to see the recent commands.

The Quick Access toolbar can now go above or below the Ribbon if you've ever wanted to move it; just click the down arrow to see your options.

This has been a long time coming - a tool in which to test your dynamic blocks while you're building them (BTESTBLOCK). Also, be sure to check out the BTABLE command, which brings up the new Paramaters Manager. There are other new commands and variables pertaining to Dynamic Blocks (BACTIONABARMODE, BCONSTATUSMODE, BCONSTRUCTION, BESETTINGS, BCPARAMETER), so be sure to explore them all.
There have been some enhancements to the Find and Replace tool. You can actually Zoom To selected objects now (or should I say "again" as this capability was missing in AutoCAD 2009). In the Find and Replace dialog, make sure "List results" is checked. You'll see a listing of every location of the word(s) you’re searching for, and to the right you'll see buttons to zoom to the selected instance or to create a selection set of all instances.

Another activity that once was the domain of the programmers is the REVERSE command that will switch the direction of plines (also lines, splines and helixes). This can also be found as an option in the PEDIT command. Speaking of splines, you can now use the SPLINEDIT command to "convert to Polyline."
Bits and pieces
Multileaders can have their properties modified segment by segment rather than as a whole, so use CTRL to select a portion and play with the Properties. Undo button in the Spell Checking tool with more intuitive selection. Express Tools Ribbon tab, Mleader styles, Mtext improvements, Dimension styles and properties, DELOBJ variable supports PEDIT & SPLINEDIT, use of Geographic Data with x-refs, additional display control for all Reference files, separate variables for snaps in various reference types (DWFOSNAP DGNOSNAP PDFOSNAP UOSNAP), tool to help identify missing/unresolved reference files, auto-complete in Open and Save dialogs, Object Size Limits raised dramatically, 3DPRINT to STL format, quick online Autodesk Seek, Action Recorder Manager and Online License Transfer.
Whew!
There are a load of little things going on in this release. I believe this is my longest Odds and Ends article to date and I wish I could take the time to illustrate every command and variable. But you can pick the ones most useful to you and explore them to your heart's content. If you have any questions, don't forget to log into the AUGI Forums and ask your peers; the AutoCAD Community is here for the asking.
.gif)
(Discuss this Article! in the HotNews Discussion Forums.)

Melanie Stone is a CAFM/ IWMS Specialist & System Administrator supporting and writing about ARCHIBUS, FMInteract, Tririga, Revit, AutoCAD, BricsCAD or similar. She served as an AUGI Director/Officer for over 6 years and is currently involved with the STLRUG. Melanie can be reached at mistressofthedorkness@gmail.com or found on Twitter as @MistresDorkness on YouTube or on her Mistress Of the Dorkness blog.
